Fermentation
The technique, like the result, stands the test of time
Imagine that you are a goatherd, watching over a flock of goats in an arid region of the world. Your flock forages on the little green and brown patches that your nomadic lifestyle seeks. Refrigeration has not yet been invented and even if it had it would not be practical to travel with.
When it is time to eat, you milk your lactating animals, saving some for later. As time goes by the milk sitting at room temperature begins to ferment. It tastes good, you don’t get sick and it is easy to digest. A few days later the indigenous bacteria have turned your stored milk into something creamy, nutritious and delicious: yogurt.
Fermentation is one of the oldest food preservation technologies there is. It is a way to harness native microorganisms as food preservation specialists. When water was unsafe to drink we fermented apples into hard cider, potatoes into vodka, grapes into wine, grains into beer and meat into salami. Dairy, of course, ferments into cheese, yogurt, paneer, clabber, kefir, buttermilk or butter, among other specialties.
Fermented foods are making a comeback thanks to books like Sandor Katz’s The Art of Fermentation, which describes in detail all the possible methods of fermentation and all the health benefits of keeping our guts adequately supplied with good bacteria. In fact, medical research now emphasizes the connection between our microbiota (gut flora) and overall health, affecting everything from digestion to depression.
While there are many forms of fermentation I am going to focus on lactic fermentation of your homegrown vegetables as one way to start engaging in some traditional food preservation technologies. Freezing and sterilization in a pressure canner are great but lactic fermentation preserves nutritional values and it is very easy to do.
The first time I fermented a vegetable I was reluctant to trust the process. I tasted the slightly piquant grated zucchini that I had salted and packed in jars a few weeks prior, got nervous and fed the rest to the chickens. We all survived, so I vowed to put more determination into my efforts!
So what exactly happens in lacto-fermentation? According to Preserving Food without Freezing or Canning, “Lactic microbial organisms — similar to those that curdle milk — develop spontaneously and convert sugars of the vegetable into lactic acid. This environment rapidly acidifies, to the point that it becomes impossible for bacteria responsible for spoilage to multiply.” Instead, beneficial bacteria feed on the ferment until you slow the process down by storing the ferment at a cooler temperature.
Katz, in The Art of Fermentation, adds, “Fermentation pre-digests foods, making nutrients more bioavailable, and in many cases fermentation generates additional nutrients or removes anti-nutrients or toxins. Ferments with live lactic-acid-producing bacteria intact are especially supportive of digestive health, immune function, and general well-being.”
So, basically, the sugar and starch in your vegetable turn to lactic acid as the beneficial microorganisms feed on the ferment. Indigenous microorganisms initiate fermentation. I am reminded of how San Francisco sourdough bread is unique to San Francisco because of this. Could this also be why grain fermented for Kentucky bourbon is uniquely Kentucky?
Salt is another component to fermenting vegetables. Salt draws the liquid out of the vegetables, creating brine that seals out oxygen. Oxygen is the enemy of this type of fermentation. The basic technique calls for mincing your vegetables into small pieces. The more surface area is exposed, the more juice is drawn from the vegetables. For example, mince mixed peppers (I like combining hot and sweet varieties) into a mixing bowl; add salt. Katz explains that salt is not critical to fermentation but that it does prove advantageous to add a little because it pulls the natural juices from the vegetable; promotes a crisper texture to the ferment; gives the salt-tolerant lactic acid bacteria a competitive advantage; and it slows fermentation, which extends shelflife. Unrefined sea salt is preferred by Katz for its trace minerals.
Once you have sprinkled a little salt over your mixture take a large wooden spoon and macerate the mixture to release the natural juices. Pour this into a clean jar, pack it down firmly so that everything is submerged in liquid (you can add some non-chlorinated water to cover if necessary and use a weight or wadded up piece of parchment paper to keep things submerged). Loosely seal the cap so that as the fermentation process produces carbon dioxide it can escape the jar. Seeing bubbles in the jar is a good thing!
Summer ferments happen faster than winter ferments because of ambient air temperature. Our pepper mixture that was done last fall took about 10 days on the counter to reach a desirable state. This becomes a personal preference and because it is sitting on the counter you can sample it. Once it is where you like it you can move it to the refrigerator for storage. I had some of those peppers for lunch today—six months later.
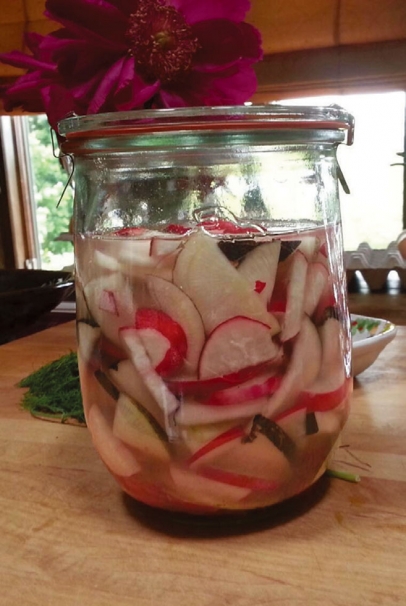
We have since invested in a fermentation crock (like the one my grandmother had) and have done mixtures of radishes and turnips that literally required nothing more than that we slice them, salt them a little, mash them around a bit in the crock and add a little water to cover. The ceramic crock came with a ceramic weight to hold the vegetables down and a water-sealable lid that keeps oxygen out but allows gases to escape. A few weeks later I packed the results into jars, stashed them in the refrigerator and we had fantastic radishes on our salad every night for dinner throughout the winter. I can’t believe how easy it was and how little it is done anymore!
Fermentation Tips
• Do not use tap water; chlorine inhibits lactic fermentation.
• Use fermented vegetables as a topping for baked potatoes or scrambled eggs, scoop them on a tortilla chip or add them to cottage cheese. Enjoy sipping the liquid as well.
• Try a few little batches in jars first before investing in a fermentation crock for large batches.